After tinkering with sprites, sounds, and text, I now had a ship (which I whipped up in MS Paint) that could be moved around the screen with the keyboard.
It was at this point I realized that my game was missing something. Something that all games have: a menu.
I was excited to use Phaser to make a snazzy retro menu with all kinds of fonts, colors, and animations. But it wasn’t long after I got started on it that I realized it was going to be difficult. Really difficult.
Phaser makes drawing text to the screen a breeze, but a menu is more than just text. There were a number of things I was going to have to figure out for myself, such as:
- Moving between menu options
- Executing code when an option is selected
- Entering or leaving submenus
- Drawing and redrawing the menu
I was lost. I tried searching the Internet for help, but all I got was hard-coded examples like this:
|
1 2 |
// Create a button with an image that runs a function when clicked var button = game.add.button(x, y, 'imageName', functionName, this); |
Which is fine for smaller games, but I wanted the player to be able to change settings, buy items, edit their ship, make missions, and more. If I was to hard-code the menu like the example above, it would mean I’d have a ton of duplicate code, and it would probably break as soon as I changed something.
After pondering the problem and reading a little about data structures, I decided to use a tree of nodes to represent my menu. Here’s how it works:
First we define a node object that stores its name, callback function, and parameters…
|
1 2 3 4 5 6 7 8 |
// The node object var node = function(name, callback, params) { this.name = name || ""; this.callback = callback || null; this.params = params; this.children = []; this.parent = null; } |
Then we create a function that connects one node to another…
|
1 2 3 4 5 6 |
// The function to add one node to another node.prototype.addChild = function(name, callback, params) { var child = new node(name, callback, params); this.children.push(child); child.parent = this; } |
I now had two nodes that were connected hierarchically, like a tree. Now I just needed to write some functions to help navigate the tree. I’ll let you imagine how they’re coded.
- getRoot()
- getParent()
- getSiblings()
- getChildren()
Now I could use code to access the different menu options, which would let the player move from one place in the tree to another. Here’s how it worked:
- If we don’t have a current node, set it to the root node
- Display parent node (as menu title)
- Display siblings nodes (as menu options)
- Check for player input
- If the player moves up, select the previous sibling node
- If the player moves down, select the next sibling node
- If the player moves back, select the parent node
- If the player moves forward, check if the node has a callback
- If the node has a callback, execute it with the node’s parameters
- If the node doesn’t have a callback, check if it has children
- If it does have children, select the first child node
- Set the current node to the selected node
- Erase the existing nodes from the screen
- Go back to step 2
I then added other parameters and functions to the node object so that I could highlight selected nodes, show information about the node, etc. It ended up looking like this:
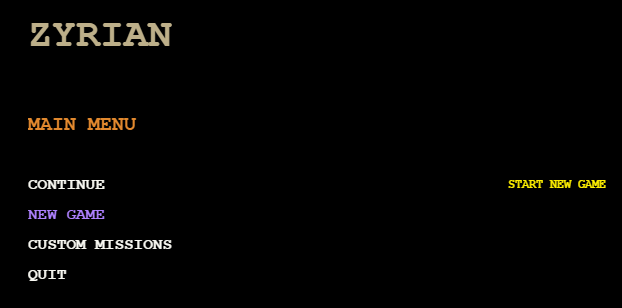
Pretty cool, huh? I was very proud of my menu, but I had no idea that it was going to get a lot more complicated. I’ll talk more about the menu in future episodes when I discuss items, vendors, and the mission maker, but in the next episode I’ll talk about transitioning between the menu and actually playing the game.