Episode 20: Controls

While I initially set up some simple keyboard controls to select menu options and move the player’s ship, I realized early on that things were gonna get a little complicated. This was for two reasons: first, that I was going to need different controls for each of the game’s states, and second, that the game was going to need mobile-friendly controls.

The Control Factory

Like most other systems, I created a factory to manage the game’s controls. This factory does a few things:

  • Loads the controls based on the game state and device type
  • Checks for input based on the current controls
  • Executes appropriate code based on input
  • Draws and updates the joystick and buttons
  • Enables or disables input

Loading Controls

I probably could have written one function that accepted the state key as a parameter, or just checked the current state, but I broke it up in to different functions to make it more readable. This is the function that loads the controls for the play state:

Checking Input

We then check controls by calling checkPlayControls from the update function in the play sate. This function is really long and complicated, but it basically does the following:

  • If input is disabled, return
  • Update the joystick and check its position
  • If the joystick is being dragged, move the player’s ship
    • Otherwise slow/stop the player’s ship
  • If we’re using a desktop, check if the keys or buttons are being pressed
    • If they are, move the player’s ship, fire weapons, etc.
  • If we’re using mobile, just check if the buttons are being pressed
    • If they are, move the player’s ship, fire weapons, etc.

These steps are executed in a complex series of conditional statements. This was a little tricky because the player could be entering multiple inputs, so we want the right things to happen in the right order.

For example, if the player is pressing the up arrow key, we want to move the player’s ship up and slow it’s lateral movement. But if the player is pressing the up arrow and left arrow keys, we want to move the player’s ship up and left. On top of that, we want to animate the joystick and buttons based on this input. This is why I used the isDown flag on my buttons rather than have them manipulate the game directly.

The Buttons & Joystick

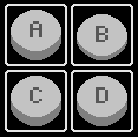
Buttons are a built into Phaser and work in a pretty simple way. You basically create it the same way as animated sprite, except the different frames are drawn based on the button’s state (hovered over, not hovered over, pressed, or unpressed). Here’s how the code looks:

Once the button is created, you bind some callback function to the button, which executes when you press it. This is what we did earlier with the setButtonEvents function.

One decision I made was to have the buttons and joystick animate when the player entered keyboard input. I basically just felt like this would make the game more interesting to look at. Plus I had to draw those things anyway, so why not make them do something?

I was originally using four directional buttons for movement, but I thought it would be better to use a joystick. I looked around at some examples and eventually decided to make my own. I did this for two reasons: first, because I wanted to learn how a joystick would work, and second, I needed the joystick to get both analog and digital input.

The analog input is used to let the player move in multiple directions at once and to accelerate at different rates depending on how far the joystick was dragged from its center position. So if the joystick moved all the way to the left and slightly up, then the player’s ship would accelerate left the maximum amount and accelerate forward slightly.

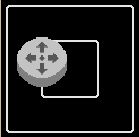
The digital input is used to navigate the menu and also to reflect keyboard input, which uses the arrow keys, so it can’t be analog. The joystick functions more like a set of four directional buttons in this scenario, because we want to register four different behaviors (move up, move down, move left, move right). Basically it works like this:

If the player drags the joystick or clicks in the joystick area, the joystick will move to the nearest directional area (top, bottom, left, or right) and execute the appropriate function. If the player presses an arrow key, the joystick will move to the corresponding directional area.

One other note: pressing multiple keys at the same time will cause the joystick to move to a location representing both inputs. For example, if the player presses the up arrow key, the joystick will move to the top-center area and fire the moveUp function (or whatever function it’s set to execute). If, while still holding the up arrow key, the player then presses the left arrow key, the joystick will move to the top-left area and fire the moveLeft function (or whatever).

The joystick ended up being a little complicated to build. Here were a few other things I had to deal with:

  • What happens when the player drags the cursor outside of the joystick area?
  • What happens when the player presses opposing directional keys at the same time?
  • What happens if the player holds down two buttons at the same time?
  • What happens if the player holds down the joystick or a directional key in the menu?
  • What happens if the player holds down the joystick and a directional key?

Pausing

One more thing I had to deal with was pausing the game. Phaser has a built-in pause feature, but there’s just one problem: Phaser’s buttons and keys don’t work when the game is paused! The left me with two options: pause the game myself or find another way to check for input. I ended up going with the second option.

The reason I didn’t try to figure out how to pause the game without pausing it is that I didn’t feel like I understand the physics, rendering, timers, and other systems well enough to mess around with them. Also, I had a much better understanding of getting user input in JavaScript. Anyway, here’s what I ended up having to do:

  • Add input events to check for tapping or clicking
    • If a tap or click event occurs, check if a button was pressed or if the joystick was moved, and if so, execute the callback function
  • Use setInterval to check for joystick input every 60th of a second (because update functions aren’t called when the game is paused)
  • Check for keyboard input by checking event.keyCode
    • If a key was pressed, execute the callback function

Unfortunately audio and animations are also disabled when the game is paused, but the only time I actually pause the game is to bring up a menu that lets the player abandon a mission, so it’s not a huge deal.

Episode 19: Loading Assets & Settings

In earlier episodes I talked about loading assets and storing magic numbers in JSON files. I’m going to expand on that a bit by showing how I chose to load assets.

I began by moving asset names into a JSON file and divided them by which state they would first be used in. There are a few reasons why I did this:

  1. I didn’t want any magic words in my code
  2. I wanted to keep a single list of the game’s assets, so it’s easy to update
  3. I only wanted to load assets when I need them

Magic Words

Here’s an example of the first issue:

Just like we don’t want to hard-code numbers into our game, we don’t really want the fireWeapon function to choose the sound to play when a weapon fires. What we want is to have the code to play whatever sound we’ve decided should play when a weapon fires, which should probably be stored in a JSON file. Here’s what that would look like:

It works, but what if we wanted to have different weapons make different sounds when they fire? Well then we simply store the fireSound in the weapon’s preset and attach it to the weapon object when it gets created by the Item Factory. Then we can do this:

Assets.json

As for storing all of my assets in one place, I ended up putting them all in a JSON file called assets.json. This file contains an object with an object inside it for each state (or each state that requires assets). And each state object has an array for each type of asset. Here’s how it looks:

Now all of the keys I use to access the assets are in one place. This lets me easily refer to the list when choosing assets such as a weapon’s firing sound.

Loading

Part of the reason for the structure of the JSON file was to easily allow it to be traversed by a loading function. I wrote just such a function in the Load Factory. Here’s how it worked:

It’s a little ugly, but it does the trick.

States

The file structure and loading function allow me to choose which assets are loaded in a given state. So rather than having the player waiting around at the start of the game for all of the assets to lead, they just wait a shorter time between states.

Any asset loaded into the game stays there (as far as I know), so assets are only loaded once, and they remain in memory across states.

I probably could have done this more efficiently by loading smaller versions of assets when the full version isn’t required, but my game doesn’t take long to load, so it didn’t seem worth it.

Settings

I’m gonna take a bit of a turn and mention how I loaded the game’s settings. As I mentioned, I moved all of the magic numbers into settings files. But in addition to this, I also changed settings to be based on the game’s screen size (when applicable), so that the game could be easily scaled.

So rather than have a sprite’s width be 10 pixels, it would instead be 2% of the game width. I’m not sure if this was a good idea, but it made more sense to me than hard-coding sprite sizes, world boundaries, etc. into the settings.

Episode 18: Drops

Alright. We just covered enemies and obstacles in the last two episodes. Now I’ll talk about drops – the final and least interesting type of entity.

Purpose

Drops are like obstacles in that they basically just scroll past the screen. However, instead of dealing damage, drops reward the player for flying into them. Drops make the game more interesting in a few ways:

  1. They give the player something different to do other than blowing things up
  2. They create the chance of something rare and awesome happening (like picking up a super valuable drop)
  3. They require the player to think about which drops they pick up (more on this in a minute)

During the mission, drops are either generated by the mission itself or by blowing up enemies and obstacles. The player can then pick them up by contacting them with their ship, then cash them in (or in the case of items, equips them) after the mission. But here’s where the strategy comes in.

Cargo

Each drop the player picks up takes up one cargo slot on the ship. The number of cargo slots on a ship is determined by its Cargo Space stat. The max number of cargo slots, like other things, is limited by the menu at 15, but it’s very rare to find a ship with 15 cargo slots. So depending on the player’s available cargo slots, they may decide not to pick up a less valuable drop in the hopes of finding a better one later in the mission.

Types

There are two types of drops: material drops and item drops. Material drops basically just have value that the player gets for cashing in the drop after the mission. Item drops, on the other hand, contain an item that the player can view, then equip or sell. Here are the drop presets:

  • Carbon: a chunk of very cheap material
  • Titanium: a chunk of cheap material
  • Platinum: a chunk of valuable material
  • Berillium: a chunk of very valuable material
  • Diamond: a chunk of precious material
  • Adamantium: a chunk of very precious material
  • Item Capsule: a capsule containing an item

And here’s what they look like:

Rewards

Drops only have a few characteristics: level, faction, and rarity. These are then used with the preset to determine the value of the drop or its item. Each material drop preset has a minimum and maximum value, and the value chosen is determined by the drop’s level. That chosen value is then multiplied according to the rarity, like so:

The chance for a drop to spawn after destroying an enemy or obstacle is based on the entity’s preset, with larger, more powerful enemies having a higher chance for a drop. The entity factory then picks a preset based on the chance each preset has to spawn, just like rarity, so the more valuable presets have a lower chance of getting picked.

Cashing In / Bounty

As for cashing in the drops, the player is presented with a drops menu option after the mission (if they completed the mission and picked up any drops). I did this because I thought it would be fun and satisfying for the player to reveal what they collected during the mission.

I also created a bounty system that works in the same way. Instead of instantly giving the player a reward for destroying an enemy or obstacle, I just add that value to the mission’s bounty. This allows the player to view their total reward at the end, which is more satisfying, but also prevents the player from keeping the money if they fail the mission.

Other Ideas

I also dabbled with letting the player shoot and destroy drops, which would make the player more careful of where they’re shooting. But this seemed too annoying for the player, especially since drops are created after blowing up enemies and obstacles.

It was also hard to decide how to convey a drop’s value to the player through its appearance. I tried using glows and outline sprites, but I eventually just tinted the drop according to its rarity.

As for the items, I initially had the player choose between equipping and discarding the item, but I figured they should be compensated for finding an item even if they didn’t want to use it. I also wanted the drop’s value to be consistent with other drops, so the player only gets a fraction (about 10%) of what they would pay to buy the drop from a vendor.

Episode 17: Obstacles

In the last episode I expanded a bit about enemies, and now I’ll do the same for the second type of entity: obstacles.

Obstacles are like enemies in the sense that the player can shoot them and crash into them. But unlike enemies, obstacles don’t have items, a rarity, or a faction.

AI

They do have AI, but it’s pretty simple. Obstacles get a y velocity so they move past the player, and some of them rotate along the way.

Some obstacles move faster than others. The speed is determine by the base scroll speed and, as with enemies, a multiplier in the obstacle’s preset. Here’s what the code that sets the AI looks like:

Presets

In addition to speed and rotation, obstacles have a few other stats like size, health, invincibility, reward value, and crash damage. The shape of the sprite is also important. Here’s a list of the obstacles I ended up with:

  • Junk: a small, fragile piece of space garbage
  • Wreckage: a large, durable fragment of a destroyed ship
  • Comet: a small, fast space projectile
  • Asteroid: a medium-sized space projectile
  • Meteor: a large, slow, and durable space projectile
  • Explosive: a medium-sized, durable, and somewhat-powerful space mine
  • Frag: a medium-sized, somewhat-fragile, and powerful space mine
  • Detonator: a large, durable, and very powerful space mine
  • Gate: a medium-sized, long, and durable structure
  • Barrier: a somewhat-large, long, and very durable structure
  • Hub: a medium-sized, durable space dock
  • Terminal: a very large, durable space dock
  • Vault: a large, very durable structure
  • Saw: a large, powerful spinning device
  • Nebula: a large, powerful, and invincible space phenomenon
  • Obelisk: a long, powerful, and invincible structure

Purpose

These obstacles serve several functions. First, they provide a threat to the player. Second, the player gets a reward for destroying them. But third and most importantly, they add different settings and challenges to the missions.

By filling some missions with asteroids and wreckage, we can create the apparent aftermath of a fleet colliding with an asteroid belt.

Structures can be used to give the feeling of attacking an enemy base.

We can also use durable or invincible obstacles to build a path that the player must navigate. Some obstacles, like gates, barriers, and spires, are long and narrow, so they are good for making paths. Also, some obstacles that don’t spin can be rotated, which lets us control their shape.

Tune in next time when we talk about the third and final type of entity: drops.