Episode 11: The Mission Maker

In the last episode I talked about missions; now I’m gonna talk about how they’re made.

A mission is just a JavaScript object, and so I originally just saved them in mission files like mission0.json, which looked something like this:

Of course there would be more rows, but I don’t want to waste space. Also, the entity objects wouldn’t be empty, they’d contain a type, preset, and rotation:

Anyway, in order to test stuff, I was opening the mission files and manually changing stats and entering presets and types. It was annoying. I decided to create a tool that would make mission making easy. Enter the mission maker.
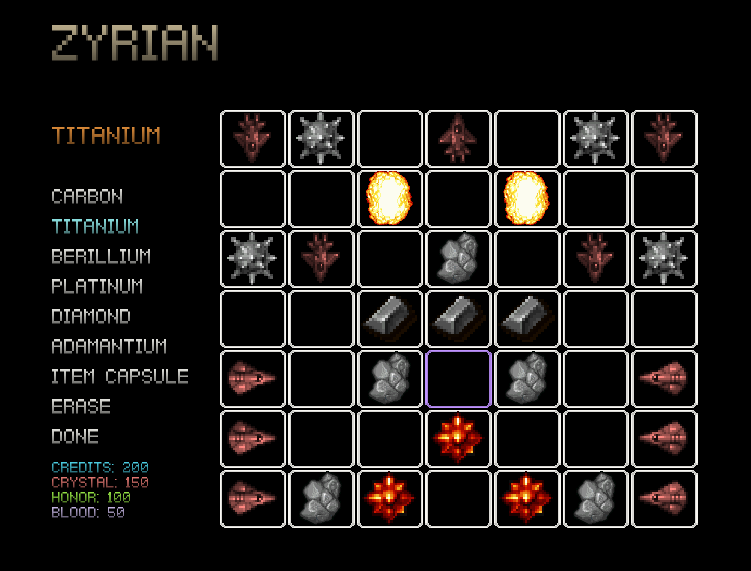
The Interface

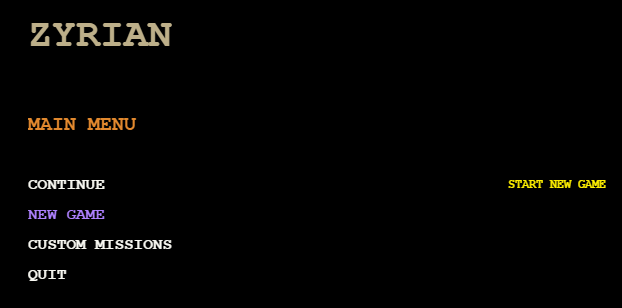
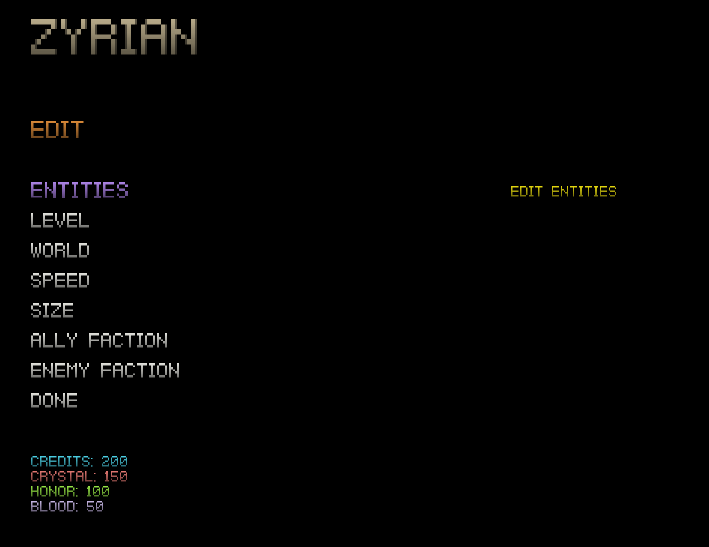
The mission maker is a graphical editor accessed through the game menu. It lets you edit all of the aspects of a mission…

Mission Maker 2

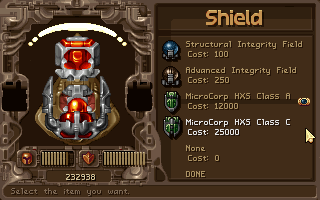
And customize the entities…

Mission Maker

Patching the mission maker into the game menu was actually pretty tough.

Entities are loaded in rows and columns, so it makes sense to display them as a two-dimensional array (or grid), but the menu uses a tree structure. I ended up creating a new type of object called a grid that contains a two-dimensional array of nodes…

Allowing the player to navigate the mission maker took a lot of time and some crappy programming, but I eventually got it working. Here were the hardest parts:

  • Rolling over between the first and last rows
  • Determining which nodes to show
  • Rendering the entities
  • Saving and loading a 2D array
  • Empty nodes
  • The waiting

After I’m done editing the mission, I just click the PRINT option, and it spits the text out to the console. Pretty neat.

Sharing

Shortly after conceiving of the mission maker, I realized that I could just leave it in the game and let players make their own missions. I suspect that this is what happens with strategy games like StarCraft and its campaign editor. After all, if you’re going to make an editor, why not let player use it?

So I made the mission maker with players in mind, but I had no idea how I was going to have them share their missions. Here were my options:

  • Print the mission object to the screen and have players copy it to a text file
  • Create links that players send to one another
  • Host a page where players post missions

The third option definitely the best, since it could allow players to discuss, rate, tag, name, categorize, and search for missions. However, it would also be quite a bit of work. My focus was (and is) to finish the game, so I went with the second option.

By incorporating a JavaScript version of PHP’s GET function, I can retrieve text from the URL and pass it into a variable. This means players can load missions by clicking a link, and they can share them just as easily. But there’s a problem…

Encoding

Missions have hundreds of entities, and each entity has a type, preset, and rotation. This means that our mission text can be thousands of characters long! Not only is this annoying, it also can cause problems in some browsers.

To get around this, I developed an encoding system that compresses the mission object into a string of text. It’s super simple.

For the mission stats, it just keeps the first letter of the factions, speed, and size. For the entities, it does the same for the type and preset, then it changes the rotation into a single digit. Then it looks for repeating entities and records the count (empty spaces are recorded as dashes).

So an entity changes from this…

Into this…

I was super proud when I got this to work. But then I had to write a decoder that turns it back into a mission object. Ugh.

Rotation

You may have noticed that I’ve mentioned entity rotation a few times, and I’m finally going to explain it.

An entity’s rotation determines what angle it’s facing and, for vessels, what side of the screen it enters from. For turrets and obstacles, rotation merely spins the entity. Drops can’t be rotated at all.

Note: I did end up changing obstacle rotation so that some of them rotate randomly once they are spawned, so they can’t be rotated in the editor.

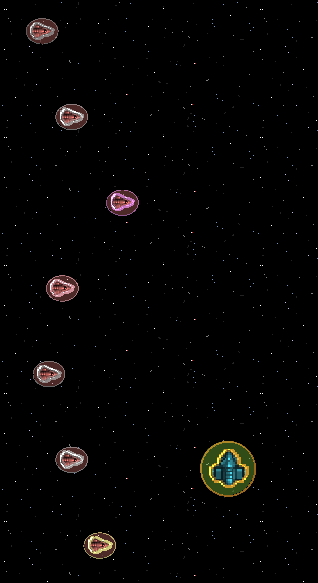
Rotation can only be done in increments of 90 degrees, so an enemy vessel can enter the screen from straight on, the left, the right, or from behind. And just as if the entity was entering from above, the vessel’s position in the row determines where on that side of the screen it will spawn.

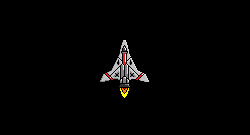
So, for example, a row of vessels like this…

row1

Will enter like this…

row2

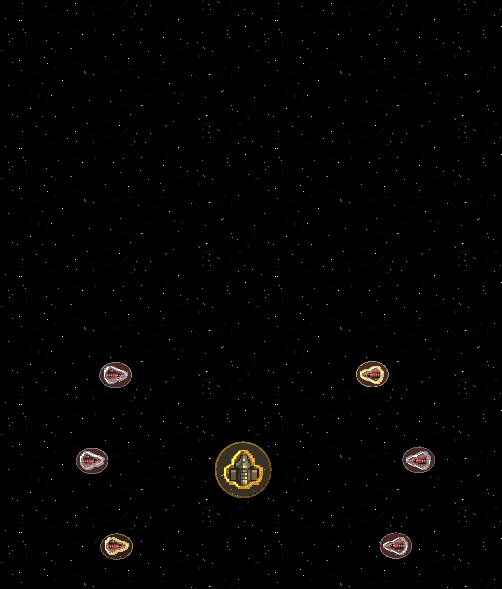
And this kind of row…

row3

Will look like so…

row4

I don’t know if this is the best way to handle rotation, but it’s the only way I could think to do it at the time.

There’s much more I want to do with the mission maker, and there are many decisions to be made. Such as:

  • Where is the mission maker located in the menu?
  • Does the player use their current save in a custom mission?
  • Can players keep reward they collect in a custom mission?
  • What are the default custom mission settings?
  • How do I handle sprite size in the mission maker?
  • Can the player put drops into a mission?
  • Shouldn’t large entities take up more than one space in the mission maker?
  • Won’t large entities overlap larger missions?
  • Should the player be able to customize entities in the mission maker?
  • Could we have entities enter from all sides at the same time?

I’ll probably do another episode on the mission maker if I end up making significant changes to it.

Stay tuned!

Episode 10: Missions

Like items and entities, mission information is stored in a JSON file. This file is called missions.json, and it specifies the mission settings.

Unlike items and entities, missions don’t have presets (at least not yet). They just have a few properties that can be customized using the mission maker.

Stats

Here are the stats of a mission:

  • Entities: the entities
  • Size: number of entities
  • Speed: delay between entities
  • Level: level of entities
  • Ally faction: faction of rewards
  • Enemy faction: faction of entities
  • World: background image

I’ll talk more about how the mission maker works in the next episode. In the meantime, here’s how a mission is launched:

The player selects and activates the menu option that launches a mission…

The mission factory then starts the play state…

The reason that the menu doesn’t directly launch the play state is that we want each factory to be responsible only for its own stuff. If you think about it, the menu factory shouldn’t really be launching missions – it should be asking the mission factory to launch a mission.

After figuring out how to store missions as objects, I ended up storing all of the missions in a single file, but I originally had the mission factory pass the index into the play state so that we could read the JSON file for that specific mission. Here’s how that would work:

From the mission’s init function, we remember the index parameter…

Then  we ask the mission factory to load the mission by index from the preload function…

This would probably be more useful for large numbers of large files, but the missions are pretty small and simple.

Entities

Whatever way we choose to lead the mission, we update the mission factory from the play state’s update function…

The mission factory’s update method will create the mission’s entities, which are read row-by-row…

It may not be pretty, but it works.

Size

The mission’s entities are read row-by-row, like a two-dimensional array or a grid. The mission’s size determines how the width and number of rows. Here are the size presets listed in mission.json:

Speed

The mission’s speed determines the delay between the rows as well as the delay at the start of the mission. Here’s what the presets look like:

I’ve also considered having the mission’s speed determine the speed of scrolling entities as well as the background, but I haven’t decided how to implement that.

Level

The mission’s level just determines the level of the entities. For enemies, this determines the level of their items. For obstacles and drops, it affects the stats directly.

The rest of the mission stats are pretty self-explanatory. The enemy faction, like the level, determines the faction of entities. As it stands, obstacles aren’t affected by faction, but that could change.

Stay tuned for the next episode, when I’ll show you how missions are created using the mission maker!

Episode 9: Entities

In order to have a proper shooter, we need stuff to shoot. Enter entities.

Entities, as I chose to call them, are the things in the game that interact with one another. In Zyrian there are four types of entities:

  • Player: the thing that the player controls
  • Enemy: things that are trying to destroy the player
  • Obstacle: things that the player can crash into
  • Drop: things the player can pick up

All these entities can be requested from the entity factory in much the same way we would get an item from the item factory…

And just like requesting an item, we can randomize anything we want by omitting a parameter. If the entity has items, as we’ll see they can, then the function will request them from the item factory.

Vessels

The first problem I encountered when designing my entities was how the entity objects relate to each other.  I wanted to figure out what they had in common with each other, so that I could use inheritance to increase code reuse and allow for expansion. For semantic reasons, this ended up being a little harder than I thought.

Players and enemies are both pretty similar – they’re ships that fly around the screen. But wait, if players and entities are ships, and if ships are items (as we saw in the last episode), then players and enemies are items.

On top of that, if items belong to ships, and if ships are items, then items can belong to items, which doesn’t really make sense.

The problem here is the use of the term ship to refer to both a type of entity and a type of item. What we need is a new term to describe an entity that has a ship and other items. Enter vessels.

Vessels are sprites with items, and one of those items is a ship. This makes things a little easier to understand, and it allows the entity to change its ship without disrupting the other items. This may not be the best solution, but I thought it made sense.

The Player

The player’s vessel is made up of the items that the player owns (I’ll talk about I saved the player’s data in another episode). So when we request a player entity (which is a vessel) from the entity factory, it looks at the items that belong to the player, fetches them from the item factory, attaches them to a vessel, and returns the vessel.

Enemies

The way an enemy’s vessel is constructed is a little different. Entities, like items, have types and presets defined in a JSON file that I called entities.json.

This file specifies the different items that an entity has. It also defines some multipliers to make enemies have more life and deal less damage than the player. Without them, the player would be evenly matched with each enemy, which probably wouldn’t be fun.

There were four basic kinds of enemy presets that I came up with:

  • Enemies that fly past the player and don’t shoot
  • Enemies that move toward the player and shoot
  • Enemies that stay at the back of the screen and shoot
  • Enemies that don’t move, but can rotate and fire at the player

Turrets

The fourth type of enemy is referred to as a turret in the game, but this entity type doesn’t actually exist in code. Turrets are just vessels that have special ships and AI and can’t move. They simply scroll past the player like an obstacle or drop, fire their weapons, and some of them aim at the player.

In order to prevent the player from acquiring the ships that turrets use, I added the unpurchasable attribute to those ship items. This prevents vendors and drops from spawning items we don’t want the player to obtain.

Obstacles

Unlike the player and the enemies, obstacles don’t have items. Obstacles are just sprites with some stats added to them based on the preset, level, faction, and rarity. The stats are:

  • Health
  • Crash damage
  • Invincible

Obstacles don’t really do anything other than float across the screen and deal damage to the player when they collide. They mainly exist to add shape and variety to missions. Anyway, here’s how I make ’em:

For my obstacle presets I just chose a bunch of sprites with different sizes and shapes.

Drops

Drops are what the player picks up during a mission. They don’t have items, and they don’t deal damage. They’re basically just sprites with the following stats:

  • Reward type
  • Rarity

The reward can either be an item or some money (more on currency in the episode on factions), and it’s modified by the rarity. So a legendary drop could either contain money multiplied by the legendary rarity’s money multiplier, or it could contain a legendary item. The drop’s preset would determine either the base amount of money or the item reward.

The drop presets are just a few options with different amounts of money and then a one that gives a random item. Here’s how I get one:

So those are my entities. In the next episodes I’ll talk about how they are generated during gameplay and how their behavior is controlled.

Episode 8: Items

Let’s take a break from the technical stuff and talk about one of the design aspects of Zyrian: items.

As I mentioned in episode 1, I wanted my game to be inspired by Tyrian, but I also wanted improve on and add to the existing features. One of my favorite things about Tyrian is the item system.

tyrian-shop

Tyrian allows players to shop for items between missions. The player uses money earned from destroying enemies and collecting pickups to buy stuff. The types of items in the game are:

  • Ship: determines the look of the player’s sprite and the amount of life the player has (life doesn’t regenerate)
  • Front Gun: the gun that fires ahead of the player (can be upgraded)
  • Rear Gun: the gun that fires to the side or behind the player (can be upgraded)
  • Shield: protects the player by absorbing damage (shields regenerate)
  • Generator: constantly generates power which is used to fire weapons and such
  • Sidekicks: special weapons that can be used separately from the front and rear guns

There are many kinds of ships, guns, shields, generators, and sidekicks, each with their own cool name, icon, and sprite. These items give the player a reason to kill stuff and collect pickups beyond getting a high score.

Shortcomings

Items are the coolest thing about Tyrian, but there are some problems:

  • It’s often very difficult to tell if one weapon is better than another
  • The same items are always for sale at the same points in the game
  • Once the player has bought the most expensive items, money becomes useless
  • The items do not scale at all during the game
  • Ships, shields and generators only have one stat: capacity
  • The player rarely needs to conserve power
  • Many of the weapons and sidekicks are quite terrible

Changes

I decided that I could fix a lot of these problems by creating randomized items. Each item type (ship, weapon, etc.) would have a number of presets, and the presets would determine the base stats of the item. The item’s stats would then be modified by a number of factors, including its level, rarity and faction (I’ll discuss these things more in future episodes).

Because the weapons were so much more diverse and interesting than the other items in Tyrian, I wanted to make every item in my game interesting. To do this, I added more stats to the other items, and I added engine as a new item type, which would determine the player’s movement speed.

My weapon system ended up being quite a bit different. Instead of choosing a front weapon and a rear weapon, the player has a set of primary weapons and a set of secondary weapons. Both sets are triggered independently and are made up of a number of individual weapons. This adds a huge degree of customization to the weapon system.

I also removed upgrading from the front and rear guns, since the player would be replacing and adding new weapons all the time, I added more weapon stats, and I got rid of sidekicks altogether. To replace sidekicks, I decided to add an accessory-type item called a module, which would give a passive bonus to other items and could also be activated to give an additional temporary boost.

In conclusion, here are the items I ended up with and their stats:

  • Ship
    • Crash damage
    • Hull capacity
    • Primary weapon slots
    • Secondary weapon slots
    • Size
  • Weapon
    • Shield damage
    • Hull damage
    • Rate of fire
    • Projectile speed
    • Projectile size
    • Range
    • Blast radius
    • Efficiency
  • Shield
    • Crash damage
    • Capacity
    • Recharge rate
    • Recharge delay
    • Efficiency
  • Engine
    • Forward acceleration
    • Forward speed
    • Lateral acceleration
    • Lateral speed
    • Efficiency
  • Generator
    • Capacity
    • Recharge rate
  • Module
    • Passive bonus
    • Active bonus
    • Duration
    • Delay

This isn’t exactly how the stats were set up when I first chose them, but it’s more-or-less the same. One significant change I made was letting the ship determine the number of primary and secondary weapon slots. Engines also underwent some redesign, which I’ll discuss another time.

Creating an Item

Once the item factory was complete-ish, I exposed one single function: item. This function lets me get any kind of item from the factory based on the parameters I pass in.

By failing to pass in a parameter, or by passing null or undefined, this will cause function to randomize that parameter. For example, if you don’t ask for a specific type of item, you could get a ship, weapon, shield, engine, generator, or module. Rarity works a little different because its based on the chances each rarity has to drop. I might talk more about rarities another time.

Anyway, now when I need to get an item, I just ask for any kind I like…

Stay tuned for the next episode, when we talk about the entities that use these items.

Episode 7: JSON

In the last couple episodes I talked about how I separated my code into different components. First I broke it down into states, then into factories. I was feeling really good about how I was organizing things, and I had an idea about how I could make it even better: JSON.

What Is It?

If you don’t know what JSON is, it’s basically a way of storing data in a format that JavaScript can understand. JSON stands for JavaScript Object Notation, and that’s exactly what it is: the code for a JavaScript object. As an example, let’s say we wanted to create an object in our JavaScript file. There’s two ways we can do it:

First, we can use a constructor…

And then create an instance of the object…

The second way we can do this is by describing the object literally…

This is how JSON works. You just describe a literal JavaScript object and save it in a file. Then you just load the JSON file into memory. No parsing, no reading lines, no need to define delimiters and special characters. A number of libraries even simplify the process of loading the file, including Phaser…

The reason this takes two steps is that the JSON file is loaded asynchronously, which just means that the computer keeps doing other stuff instead of waiting for the file to load.

Magic Numbers

So how could JSON help make my code better? Well any time I encounter a magic number, I can move it to a JSON file. If you don’t know what magic numbers are, they’re these nasty critters that make your code confusing and difficult to maintain…

In the code above, our x and y values for the sprite’s location are magic numbers. They’re magic because they aren’t based on any logic or conditions. They’re just hard-wired into the code.

It would be better to set the x and y values based on the game’s resolution…

This works fine, but it would probably be even more smarter to move the starting location to a JSON file called something like settings.json and store it in an appropriately-named object…

Once we’ve loaded the JSON file into a variable (like GameSystem.settings), we can then create the player’s sprite without using any magic numbers…

As I kept exporting more and more magic numbers out of my code, I found that my settings.json file was pretty big and difficult to read, so I decided to create a number of JSON files and store relevant stuff in each of them. Here’s what I ended up with:

  • settings.json
  • assets.json
  • items.json
  • entities.json
  • factions.json
  • menu.json
  • worlds.json
  • missions.json

I know I said this in the last episode, but I’ll talk more about these things in the future.

Anyway, JSON is awesome. I don’t know what a professional game programmer would think of this approach, but it works for me!

Episode 6: Factories

So initially I had all my code in one file. This was fine at first, after separating my code into states (see previous episode), I continued to add more and more features, most of which were pretty raw. Eventually my JavaScript file was over 3,000 lines long (which seemed huge to me).

This was about the time that I initially called it quits. My code was a jumbled web of noodles, and it was getting more and more difficult to change or add stuff. I was getting less done each time I sat down and coded, and I was losing direction and drive.

As I mentioned in the introduction, I found motivation to pick Zyrian back up after watching some videos on YouTube about the importance of finishing your software projects. I was inspired. I wanted to accomplish something. I wanted to be proud of something. I wanted to show someone something that I forged with my own 10 fingers and have them say, “oh, that’s kinda neat.”

Anyway, when I came back to the project a few months later, I found my code to be borderline incomprehensible – and I’m the one who wrote it! I was pretty ashamed of myself, so I decided the first thing I was going to do was come up with a better way to organize my code.

After reading a bit online about JavaScript programming patterns, I found something called the module pattern. If you don’t care about programming patterns, skip the boring stuff.

Boring Stuff

JavaScript is a powerful language, but if you have a background in a more tightly-controlled language like Java, you may find JavaScript’s freedom frightening. In JavaScript, all of an object’s properties and behaviors are public, which can lead to errors and poor coding. After all, why write accessors and mutators when you can just access your properties directly?

The module pattern is a way of encapsulating code by defining anonymous functions and immediately executing them. Because everything defined in a function is local in scope, and because all functions in JavaScript are objects, we can create an anonymous function and return only the properties and behaviors we want to expose.

As an example, I have a module that controls sound in its own file called sound.js, and it looks kinda like this (except with more things in it):

This example of a factory returns three functions: initplaySFX, and increaseSFXVolume, and it has a property called SFXVolume which it uses internally to determine loudness. At this point we’ve successfully created an object that only exposes the functions we want it to, but things really get interesting when we start tying multiple modules together…

By passing our sound factory as an argument into the projectile factory, we are then able to expose only the init and playSFX functions. Ta-da!

Side note: I know Phaser has some built-in support for things called “plugins”, but I never got the hang of it. Perhaps I’ll investigate more in the future.

Interesting Stuff

I put all my game code in a variable called GameSystem so it wouldn’t interfere with other scripts or libraries. I could have called it Zyrian, but I wasn’t sure I would be sticking with the name (and I’m still not sure). So from now on when you see GameSystem.yadaYada, that’s just referencing some part of my game’s code.

Anyway, I now had a strategy for fixing my problem, so I painstakingly traversed each line of code and transmuted them all into different modules, which I called factories. Here are the factories I ended up with:

  • collisions.js
  • controls.js
  • entities.js
  • helpers.js
  • init.js
  • items.js
  • load.js
  • menu.js
  • nodes.js
  • npcs.js
  • missions.js
  • projectiles.js
  • sound.js
  • storage.js

Some of these were created right away, and some of them spawned from stuff I added later on. You may be able to figure out what they do just by the name, but I’ll explain most of them in future episodes.

Yay better code!

Episode 5: States

I never realized this before working on this project, but there’s more to a game than just the part where you move your character around and shoot stuff. What I mean is that interacting with a game means traversing a number of different modes, menus, and interfaces. Let’s use Rare’s legendary first-person shooter, GoldenEye, as an example. Here’s how a player gets from powering on the system to completing a mission:

  • A number of logo images are shown
  • An animation is played (along with music)
  • The main menu is shown
  • The mission selection menu is shown
  • The mission is loaded and gameplay begins
  • The mission completion menu is shown
  • The main menu is shown

As you can see, the experience of playing GoldenEye is comprised of much more than just the gameplay. And although the gameplay is by far the most complex and important component, the rest of the game is certainly worthy of attention.

All this is to say I realized that I was going to have to create these different components and that I should probably keep them separate. It turns out that Phaser has a system for doing just that, and it calls these components states.

What Are States?

States are cool. In addition to separating the different phases of the game, states allow you to load stuff when it’s needed. Players generally don’t like waiting for their games to load, and states let you be strategic about when and where you load assets.

For example, the menu probably doesn’t need all of the sprites and sounds that are used during gameplay, so you can avoid loading them until you actually launch the gameplay state. However, you don’t want to start loading everything only after the player decides to start the game, so it would probably be smart to start preloading assets in advance. The strategy can be tricky, but the code is pretty straightforward.

States can be quickly and easily created…

And starting them is a breeze…

Phaser’s states come with some functions that will automatically be called at various stages of the game. These include init, preload, create, render, and update. If you define these functions in the state, then Phaser will execute the code at the appropriate time.

We saw this in Episode 3 when we used the preload function to load an image asset…

The create function to enable the keyboard…

And the update function to check for input…

So if we were to start whatever state these functions belong to, the preload and create functions would run as the state started, and the update function would be repeatedly called during the game loop until we started another state. Neat!

My States

I decided to use four states in Zyrian:

  1. Boot: initializes the Phaser engine, creates the game object, and launches the Preload state
  2. Preload: loads game settings, fonts, and all the assets for the Menu state, then launches the Menu state
  3. Menu: loads the menu interface, captures user input, loads all the assets for the Play state, and allows the player to launch the Play state
  4. Play: loads mission data, creates sprites, captures user input, and launches the Menu state if the player aborts or completes the mission

I initially thought of using a fifth state to handle the end of a mission (indicate success or failure, display the player’s score, give some menu options, etc.), but I decided that to just use the Menu state.

In the next episode I’ll talk about factories and how I separated the internal workings of the game from the states.

Episode 4: The Menu

After tinkering with sprites, sounds, and text, I now had a ship (which I whipped up in MS Paint) that could be moved around the screen with the keyboard.

ship

It was at this point I realized that my game was missing something. Something that all games have: a menu.

I was excited to use Phaser to make a snazzy retro menu with all kinds of fonts, colors, and animations. But it wasn’t long after I got started on it that I realized it was going to be difficult. Really difficult.

Phaser makes drawing text to the screen a breeze, but a menu is more than just text. There were a number of things I was going to have to figure out for myself, such as:

  • Moving between menu options
  • Executing code when an option is selected
  • Entering or leaving submenus
  • Drawing and redrawing the menu

I was lost. I tried searching the Internet for help, but all I got was hard-coded examples like this:

Which is fine for smaller games, but I wanted the player to be able to change settings, buy items, edit their ship, make missions, and more. If I was to hard-code the menu like the example above, it would mean I’d have a ton of duplicate code, and it would probably break as soon as I changed something.

After pondering the problem and reading a little about data structures, I decided to use a tree of nodes to represent my menu. Here’s how it works:

First we define a node object that stores its name, callback function, and parameters…

Then we create a function that connects one node to another…

I now had two nodes that were connected hierarchically, like a tree. Now I just needed to write some functions to help navigate the tree. I’ll let you imagine how they’re coded.

  • getRoot()
  • getParent()
  • getSiblings()
  • getChildren()

Now I could use code to access the different menu options, which would let the player move from one place in the tree to another. Here’s how it worked:

  1. If we don’t have a current node, set it to the root node
  2. Display parent node (as menu title)
  3. Display siblings nodes (as menu options)
  4. Check for player input
    • If the player moves up, select the previous sibling node
    • If the player moves down, select the next sibling node
    • If the player moves back, select the parent node
    • If the player moves forward, check if the node has a callback
      • If the node has a callback, execute it with the node’s parameters
      • If the node doesn’t have a callback, check if it has children
        • If it does have children, select the first child node
  5. Set the current node to the selected node
  6. Erase the existing nodes from the screen
  7. Go back to step 2

I then added other parameters and functions to the node object so that I could highlight selected nodes, show information about the node, etc. It ended up looking like this:

Zyrian Menu Small

Pretty cool, huh? I was very proud of my menu, but I had no idea that it was going to get a lot more complicated. I’ll talk more about the menu in future episodes when I discuss items, vendors, and the mission maker, but in the next episode I’ll talk about transitioning between the menu and actually playing the game.

Episode 3: Getting Started with Phaser

As I mentioned before, I had no idea how to use a framework or build a proper game heading into this. In the past I’d just aimlessly start coding a random feature until it was sort of working, then I’d move on to another random feature. I had no strategy, no direction, and no plan.

This time was different – I had a framework, I had examples, and I had documentation. So I started by trying to get Phaser to do some useful stuff.

The Basics

First I learned how to add Phaser to my code…

Then I learned how to load a sprite…

And draw it to the screen…

Then I learned how to add controls…

And move the player…

I learned how to prevent the player from leaving the screen…

Or kill the them when they leave the screen…

At this point I was feeling really good about the whole framework thing. Rather than trying to figure out how to write code that would draw and move stuff, I was just drawing and moving stuff. It was empowering.

After spending a few days playing around with sprites, I tried adding music and sound effects…

And text too.

For everything I could think of adding to my game, Phaser could do it. All I had to do was Google “Phaser add sprite” or “Phaser play music” and the answer would come up! My framework was allowing me to turn my ideas into code at an incredible rate.

This is probably super obvious to any experienced game developer, but for me it was eye-opening. Game-makers make game-making faster and easier! Who knew?

I’ll be including more code examples in future posts, but I won’t be going into too much detail. In other words, I’m going to focus on what I did, not how I did it. If you want to learn more about using Phaser, check out the examples and tutorials on their site.